This is the second post in a series on working with Healthcare Cost and Utilization Project (HCUP) datasets using Python and other open-source alternatives to SAS and SPSS, which are the two primary data tools supported by HCUP.
Particularly if you are new to programming, the world of Python installation, packages, and modules can be daunting. As someone whose skill set more closely resembles that of a business analyst than a software developer myself, it's a poor use of time for me to muscle through a lot of detailed customization/config/compile steps that I'll seldom if ever need to know how to do again.
Fortunately, there is a bundled solution available tailored specifically to the needs of analytical and scientific Python users. And, once that's installed, there are only a few additional steps to get going with HCUP data. This post will go through all of the steps you need to get up and running with Python and the PyHCUP package.
1. Install Canopy
Python is a language, and in order to have it be understood by a computer you will need to provide that computer with an interpreter. One way of accomplishing this is with Canopy, a very convenient offering from Enthought Scientific Computing. Canopy provides a Python interpreter and some fantastic tools for writing Python all in a single bundle.
What's more, Enthought provide a free version of Canopy ("Canopy Express"), and give the full version away for free for academic use. If you work in academia and have a *.edu email address, you may qualify. However, even the free version is more than enough for our purposes.
Head over to the Enthought Canopy downloads page, which will try to detect the right download for your operating system and present you with a download link. For most people, the process should be as simple as running the installer after the download finishes (you may need administrator privileges, depending on your operating system).
If you run into trouble, detailed instructions are available for Windows, Mac, and Linux.
2. Install pip with easy_install
pip (all lowercase) is a package manager for Python. Python packages are essentially pieces of code that you can download and integrate into your own code to avoid re-writing code that some one else already wrote. The volume, quality, and ease of use of Python packages are part of why Python is such a useful programming language. In fact, if you're reading this post, it's likely because you want to use a Python package to so something without having to write all the code from scratch.
When you try to use pip to install a Python package, pip will automatically look in known repositories of Python packages for items that match your desired package. Once it finds a match, pip will download and install the package in such a way that you can access it without knowing the details of where it has been downloaded or how to install it.
Amusingly, Canopy comes with a different package manager called easy_install which makes it simple to get pip up and running. Open a command prompt or terminal and type the following to get pip.
easy_install pip
3. Install PyHCUP with pip
We will use pip to install the PyHCUP package, which will make it easily accessible in your code, without having to handle the details of exactly where to download or install a package. Again, open a terminal or command prompt. Type this command.
pip install pyhcup
You should see some response output like this.
Downloading/unpacking pyhcup Downloading PyHCUP-0.1.3.zip Running setup.py egg_info for package pyhcup Installing collected packages: pyhcup Running setup.py install for pyhcup Successfully installed pyhcup Cleaning up...
If you get an error message, double check for typos in your pip install pyhcup command.
4. Use an IPython notebook in Canopy to import PyHCUP
Finally, let's launch Canopy and use it to access the tools in the PyHCUP package.
Open Canopy, which should have a shortcut in the Start Menu under "Enthought Canopy" for Windows or in your Applications for Mac. The Linux install location may vary depending on your distribution. Once open, Canopy has a launcher window with options to open the Editor, Package Manager, or Documentation Browser. We'll explore the other options in the future, but for now open the Editor.
The screengrab below is borrowed from the Canopy documentation and should look something like your screen.
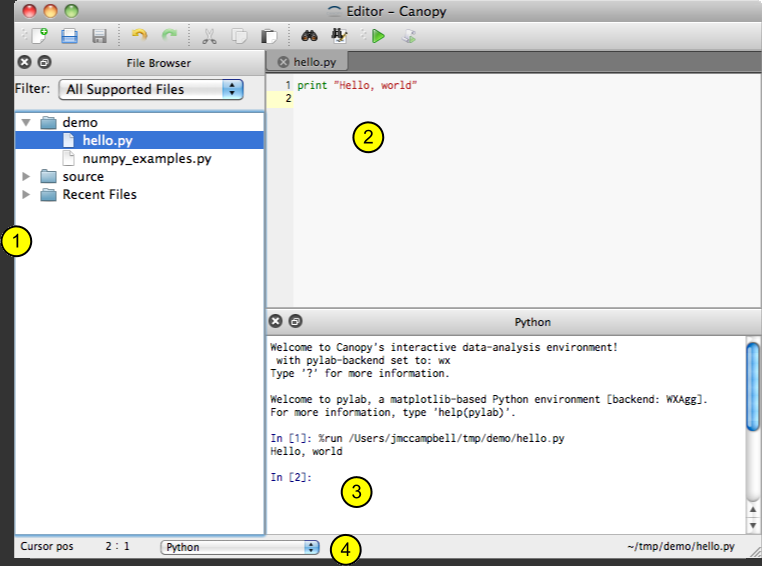
By default, the Editor will open a plain text file for editing (marked with a 2, above), with an area for output of code you run (3). It will also have a section for browsing and opening files on disk (1). None of these are really what we want. Close all of these by clicking the small (x) next to them.
Instead, we want to start a new IPython Notebook. Go to File>>New and choose "IPython Notebook." You should have a blinking cursor in a window that looks something like this.
In IPython parlance, this is a cell. You can type Python code into a cell and then hit Shift+Enter to run the code in the selected cell. Things that you do in one cell persist, so that you can do some things in a cell to define a variable called my_stuff and then use my_stuff in a later cell. You can even save an IPython Notebook and it will preserve all the code you have written in various cells. Subsequent posts on using Python for HCUP data will depend heavily on IPython Notebooks, and will often include a notebook of the code in the post that you can open and use yourself.
For now, type the following and hit Shift+Enter to run the cell.
If you are successful, the square brackets next to the "In" will have a number one in them, like this. If you get any other output, check for typos.
That's it for setup and configuration. We'll get more into actually using the PyHCUP library in the next post.
No comments:
Post a Comment